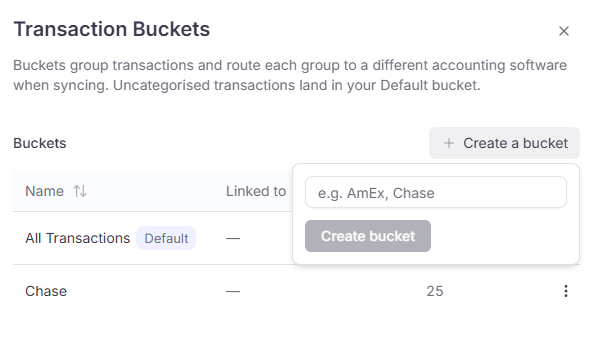
A bucket is a group of transactions in ClearSpend. Use one bucket per bank or card account so imported and pushed charges stay separate.Each Xero bank account can be linked to one bucket. Another Xero connection cannot reuse that account or that bucket. If either is already in use, it is greyed out.Every workspace starts with All Transactions. Create more from Manage buckets in the bucket picker. See Managing buckets.
Transaction Buckets: create a bucket, see which accounts are linked, and rename or delete.
With Xero → ClearSpend, ClearSpend pulls bank and card transactions from the Xero account you selected. Those charges appear on Transactions and count toward Home totals.Pair this with Gmail, Google Drive, or a file upload so each charge can be matched to proof.
ClearSpend → Xero sends reconciled charges from ClearSpend to Xero. It runs only when you click Sync to Xero.
1
Have transactions ready
Start with charges already in ClearSpend from Xero → ClearSpend, Plaid, a statement upload, or earlier imports.
Transactions: charges in your workspace before you reconcile and assign GL codes.
2
Reconcile and add a GL code
Match an invoice or receipt to each charge, finish review, and assign a chart of accounts (GL) code. Charges missing either stay in Needs Review.
Transactions: reconciled charges with a GL code assigned.
3
Open Ready to Sync
On Transactions, open the Ready to Sync tab. Charges with both a matched invoice and a GL code appear here. Use Sync to Xero in the toolbar when you are ready to push them.
Transactions: Ready to Sync tab with the Sync to Xero button.
4
Confirm on Synced
After the push finishes, open the Synced tab. Charges that synced successfully show here.
Transactions: Synced tab after a successful push to Xero.
Yes, if you choose Xero → ClearSpend. Charges from the selected Xero account appear on Transactions. ClearSpend → Xero does not import spend.
Is push automatic?
No. Push is manual. Review charges first, then click Sync to Xero.
Does ClearSpend change my Xero file on its own?
No. ClearSpend only sends charges when you sync them. It does not edit your books in the background.
What do I need before I can push?
A ClearSpend → Xero connection, a GL code on the charge, and a matched invoice. Without a GL code and matched invoice, the charge stays in Needs Review. See Sync to accounting.
Where do I add a GL code?
On the charge row on Transactions, in the transaction detail panel, or from the subscription detail. A GL code is required before a charge can move to Ready to Sync.
Can I connect one Xero bank account to more than one bucket?
No. One bank account can be linked to one bucket. Create another bucket if you need to connect a second account. See Managing buckets.